- Published on
How to deploy App Store and Beta versions of React Native iOS app from Azure DevOps pipeline
So testers can install both App Store and Beta versions of your app
- Authors
- Name
- Nico Prananta
- Follow me on Bluesky
A few weeks ago, I wrote a guide on how to deploy React Native iOS app to TestFlight from Azure DevOps pipeline. Once you and testers in your team have made sure that the app is working by installing it via TestFlight, the owner of the app can submit the app to the App Store. The problem is the testers cannot install both versions of the app (TestFlight and App Store versions) in the same iPhone. So they either need to have two iPhones or to waste time by installing and reinstalling the app every time they want to test it.
In this guide, I'll show you how to deploy two versions of the app to TestFlight. This way the testers can install the beta version of the app from TestFlight and the app store version from the App Store in the same iPhone. I highly recommend you to read the previous article first.
Tool Versions
Before we start, let me tell you the versions of the tools I'm using as of this writing:
- Xcode: 15.4 Build version 15F31d
- Fastlane: 2.222.0
- CocoaPods: 1.15.2
- Ruby: 3.3.4 (2024-07-09 revision be1089c8ec) [arm64-darwin23]
- Bundler: 2.5.17
Create a new app on App Store Connect
First thing to do is to create a new app on App Store Connect. I won't go into the details of how to do that because I assume you already know how to do that. But the important part is to create a new bundle identifier. In my case, I use the same identifier as the one I use for the App Store version but prefixed with .beta. For example, if the bundle identifier of the app is com.mycompany.myapp, then the bundle identifier of the beta version is com.mycompany.myapp.beta.
Create certificates and provisioning profiles with Fastlane's match
Once you have created the app on App Store Connect, you can create the certificates and provisioning profiles with Fastlane's match. I assume you already did it once following the match guide in the previous article so you should already have the git repository to store the certificates and provisioning profiles.
To create the certificates and provisioning profiles for this beta app, you can run the following command from the ios directory:
bundle exec fastlane match appstore -a com.mycompany.myapp.beta
Create a new target in Xcode
Next, open the workspace file of the app in Xcode. Then duplicate the target of the app.
Image
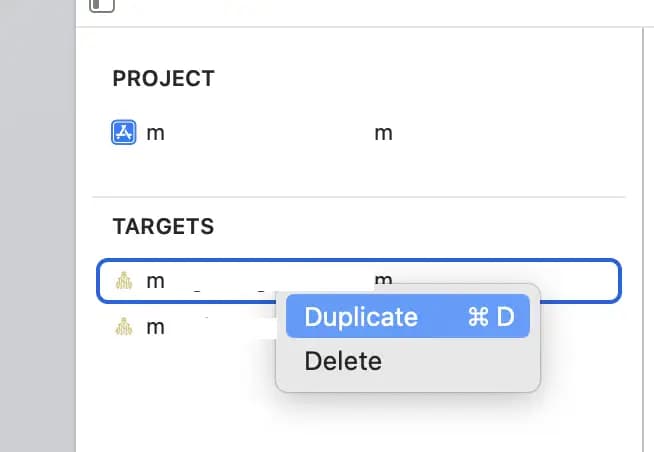
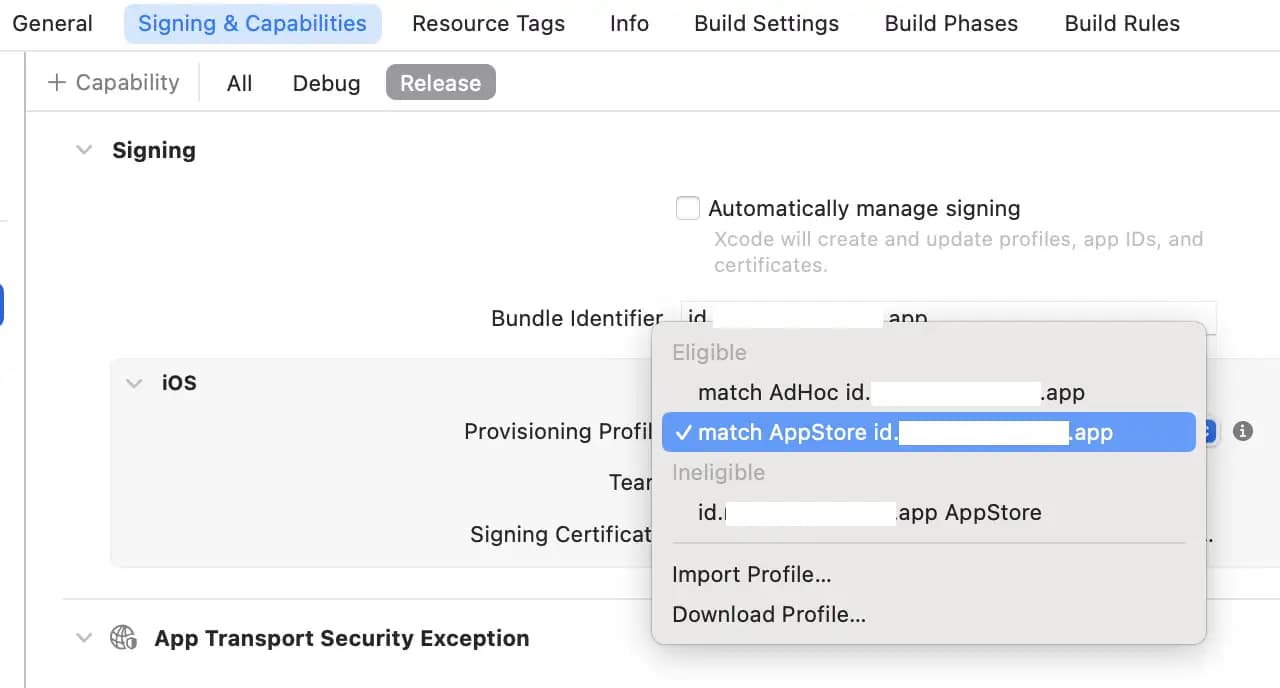
Once you have duplicated the target, make sure it has the same bundle identifier as the one you just created. You also need to make sure that each target uses the correct provisioning profile by going to the Signing & Capabilities tab and selecting the correct provisioning profile. The provisioning profile you want to use should start with match AppStore.
Image
Update the Podfile
Now we need to make sure the cocoapods third party libraries are used by both targets. To do that, use the following Podfile:
require File.join(File.dirname(`node --print "require.resolve('expo/package.json')"`), "scripts/autolinking")
require File.join(File.dirname(`node --print "require.resolve('react-native/package.json')"`), "scripts/react_native_pods")

require 'json'
podfile_properties = JSON.parse(File.read(File.join(__dir__, 'Podfile.properties.json'))) rescue {}

ENV['RCT_NEW_ARCH_ENABLED'] = podfile_properties['newArchEnabled'] == 'true' ? '1' : '0'
ENV['EX_DEV_CLIENT_NETWORK_INSPECTOR'] = podfile_properties['EX_DEV_CLIENT_NETWORK_INSPECTOR']

platform :ios, podfile_properties['ios.deploymentTarget'] || '13.4'
install! 'cocoapods',
  :deterministic_uuids => false

prepare_react_native_project!

abstract_target 'myreactnativeapp-base' do
  use_expo_modules!
  config = use_native_modules!

  use_frameworks! :linkage => podfile_properties['ios.useFrameworks'].to_sym if podfile_properties['ios.useFrameworks']
  use_frameworks! :linkage => ENV['USE_FRAMEWORKS'].to_sym if ENV['USE_FRAMEWORKS']

  use_frameworks! :linkage => :static
  use_react_native!(
    :path => config[:reactNativePath],
    :hermes_enabled => podfile_properties['expo.jsEngine'] == nil || podfile_properties['expo.jsEngine'] == 'hermes',
    # An absolute path to your application root.
    :app_path => "#{Pod::Config.instance.installation_root}/..",
    :privacy_file_aggregation_enabled => podfile_properties['apple.privacyManifestAggregationEnabled'] != 'false',
  )

  target 'myreactnativeapp' do
  end

  target 'myreactnativeapp-beta' do
  end

  post_install do |installer|
    react_native_post_install(
      installer,
      config[:reactNativePath],
      :mac_catalyst_enabled => false,
      :ccache_enabled => podfile_properties['apple.ccacheEnabled'] == 'true',
    )

    installer.generated_projects.each do |project|
      project.targets.each do |target|
        target.build_configurations.each do |config|
          config.build_settings['CODE_SIGNING_ALLOWED'] = 'NO'
          config.build_settings['ENABLE_BITCODE'] = 'NO'

          config.build_settings['SUPPORTED_PLATFORMS'] = 'iphoneos iphonesimulator'
          config.build_settings['SUPPORTS_MACCATALYST'] = 'NO'
          config.build_settings['SUPPORTS_MAC_DESIGNED_FOR_IPHONE_IPAD'] = 'NO'
        end
      end
    end

    # This is necessary for Xcode 14, because it signs resource bundles by default
    # when building for devices.
    installer.target_installation_results.pod_target_installation_results
      .each do |pod_name, target_installation_result|
      target_installation_result.resource_bundle_targets.each do |resource_bundle_target|
        resource_bundle_target.build_configurations.each do |config|
          config.build_settings['CODE_SIGNING_ALLOWED'] = 'NO'
          config.build_settings['IPHONEOS_DEPLOYMENT_TARGET'] = '13.4'
        end
      end
    end
  end

  post_integrate do |installer|
    begin
      expo_patch_react_imports!(installer)
    rescue => e
      Pod::UI.warn e
    end
  end
end
Change the myreactnativeapp and myreactnativeapp-beta targets to use the correct target names that you have set in Xcode. Then run bundle exec pod install to install the third party libraries.
Update Fastfile
Next we need to update the Fastfile to have additional lanes to deploy the beta version of the app. You can use the following Fastfile:
skip_docs

default_platform(:ios)

platform :ios do
  desc "Generate beta badge" # To run this lane, you need to have ImageMagick installed and the fastlane-plugin-badge https://github.com/HazAT/fastlane-plugin-badge
  lane :add_beta_badge do
    add_badge(dark: true)
  end

  desc "Push a new beta build to TestFlight"
  lane :beta_testflight do
    # add_badge(dark: true) # We don't use this for now because it needs ImageMagick and the pipeline in Azure DevOps doesn't have it. It's possible to install it first in the pipeline but that makes the pipeline longer. It's easier to just generate the beta badge and copy it in the pipeline.
    sh "cp ../YourProject/Images.xcassets/AppIcon.appiconset/App-Icon-1024x1024@1x-beta.png ../YourProject/Images.xcassets/AppIcon.appiconset/App-Icon-1024x1024@1x.png"
    push_to_testflight(
      app_identifier: "id.myreactnativeapp.app.beta",
      scheme: "myreactnativeapptourism-beta",
      apple_id: "the_beta_app_apple_id" # Not the user email address!
    )
  end

  desc "Push a new build to TestFlight"
  lane :store_testflight do
    push_to_testflight(
      app_identifier: "id.myreactnativeapp.app",
      scheme: "myreactnativeapptourism",
      apple_id: "the_store_app_apple_id" # Not the user email address!
    )
  end

  private_lane :push_to_testflight do |options|
    setup_ci

    update_project_team( # Set the right team on your project
      teamid: CredentialsManager::AppfileConfig.try_fetch_value(:team_id)
    )

    build_id = ENV['BUILD_BUILDID'] # use azure devops build id. tried latest_build_number action but it needs the App Store Connect API key.

    increment_build_number(
      xcodeproj: "myreactnativeapptourism.xcodeproj",
      build_number: build_id
    )

    match(
      type: "appstore",
      readonly: is_ci,
      app_identifier: options[:app_identifier],
      git_basic_authorization: ENV['MATCH_GIT_BASIC_AUTHORIZATION']
    ) # This automatically creates or downloads certificates, provisioning profiles, and more

    build_app(
      workspace: "myreactnativeapptourism.xcworkspace",
      scheme: options[:scheme],
      clean: true,
      verbose: true,
      export_method: "app-store",
      build_path: "./builds",
      output_directory: "./builds"
    )

    upload_to_testflight(
      skip_waiting_for_build_processing: true,
      apple_id: options[:apple_id],
      username: ENV['FASTLANE_USER']
    )
  end
end
Adjust the project, workspace, and scheme names to match your project. If your original app icon is dark, you should remove the dark: true argument from the add_badge lane.
Differentiate the icons for the beta and the store version
Fastlane has a plugin to add a badge to the app icon called fastlane-plugin-badge. But the problem is that it needs ImageMagick to be installed which the macos image in the Azure DevOps pipeline doesn't have.
We could install ImageMagick in the pipeline first but that would make the pipeline runs longer. So instead, I generate the badge for the beta version first by running the following command:
bundle exec fastlane add_beta_badge
That command will replace the existing icon. So you should rename it to something else first then commit it to the git repository. Finally, we simply copy it before building the app in the Azure DevOps pipeline as shown in the line 14 of the Fastfile above.
Multiple Azure DevOps pipelines
To deploy both versions of the app from Azure DevOps pipeline, you can update the pipeline configuration I gave in the previous article to have two jobs. But according to experiment I did, having two heavy jobs in the same pipeline was not a good idea because it made the pipeline ran significantly longer. So I decided to have two separate pipelines. One pipeline for the beta version and one pipeline for the store version.
But since they have a lot of common steps, I use the Templates feature of Azure DevOps pipeline. The template file looks similar to the pipeline configuration I gave in the previous article:
parameters:
  - name: fastlaneLane
    type: string
    default: 'store_testflight'

steps:
  - task: NodeTool@0
    inputs:
      versionSpec: '20.x' # or whichever version you're using
    displayName: 'Install Node.js'

  - script: |
      echo Installed Xcode versions:
      ls /Applications | grep 'Xcode'
      echo currently selected xcode:
      xcrun xcode-select --print-path
      echo selecting latest xcode...
      sudo xcode-select -s /Applications/Xcode_15.2.app
      xcrun xcode-select --print-path
      xcodebuild -version
    displayName: 'Select Xcode version'

  - script: |
      echo "STRAPI_API_TOKEN=$(STRAPI_API_TOKEN)" > .env
      echo "STRAPI_HOST=$(STRAPI_HOST)" >> .env
      echo "WEB_HOST=$(WEB_HOST)" >> .env
    displayName: 'Create .env file'
    env:
      STRAPI_API_TOKEN: $(STRAPI_API_TOKEN)
      STRAPI_HOST: $(STRAPI_HOST)
      WEB_HOST: $(WEB_HOST)

  - task: Cache@2
    inputs:
      key: 'npm | "$(Agent.OS)" | package-lock.json'
      restoreKeys: |
        npm | "$(Agent.OS)"
      path: $(System.DefaultWorkingDirectory)/node_modules
      cacheHitVar: NPM_CACHE_RESTORED
    displayName: Cache node_modules

  - script: |
      npm ci
    displayName: 'Install dependencies'
    condition: ne(variables.NPM_CACHE_RESTORED, 'true')

  - task: Cache@2
    inputs:
      key: 'bundle | "$(Agent.OS)" | Gemfile.lock'
      restoreKeys: |
        bundle | "$(Agent.OS)"
      path: $(System.DefaultWorkingDirectory)/.bundle
      cacheHitVar: BUNDLER_CACHE_RESTORED
    displayName: 'Cache bundle dependencies'

  - script: |
      gem install bundler
      bundle config path $(System.DefaultWorkingDirectory)/.bundle
      bundle install
      bundle update
    displayName: 'Install and update bundle'
    condition: ne(variables.BUNDLER_CACHE_RESTORED, 'true')

  - task: Cache@2
    inputs:
      key: 'pods | "$(Agent.OS)" | ios/Podfile.lock'
      restoreKeys: |
        pods | "$(Agent.OS)"
      path: $(System.DefaultWorkingDirectory)/ios/Pods
    displayName: Cache CocoaPods

  - script: |
      cd ios
      bundle exec pod install
    displayName: 'Install CocoaPods dependencies'

  - script: |
      cd ios
      export MATCH_GIT_BASIC_AUTHORIZATION=$(printf ":$AZURE_PERSONAL_ACCESS_TOKEN" | base64)
      bundle exec fastlane ${{ parameters.fastlaneLane }}
    env:
      MATCH_PASSWORD: $(MATCH_PASSWORD)
      FASTLANE_USER: $(FASTLANE_USER)
      FASTLANE_PASSWORD: $(FASTLANE_PASSWORD)
      FASTLANE_APPLE_APPLICATION_SPECIFIC_PASSWORD: $(FASTLANE_APPLE_APPLICATION_SPECIFIC_PASSWORD)
      AZURE_PERSONAL_ACCESS_TOKEN: $(AZURE_PAT)
      STRAPI_API_TOKEN: $(STRAPI_API_TOKEN)
      STRAPI_HOST: $(STRAPI_HOST)
      WEB_HOST: $(WEB_HOST)
      CI: true
    displayName: 'Build and Upload to TestFlight'
Then I created two pipelines for the beta version and the store version:
trigger:
  - master # or whatever your main branch is named

pool:
  vmImage: 'macos-13' # Don't use macos-latest because it's not the latest macos image in the pool. Change this to whatever the latest macos version is if there's a newer version available.

variables:
  - group: ios-build-secrets # Create this variable group in Azure DevOps to store sensitive information
  - name: DEVELOPER_DIR
    value: '/Applications/Xcode_15.2.app/Contents/Developer'

stages:
  - stage: testflight
    displayName: 'TestFlight Store iOS'
    jobs:
      - job: StoreTestFlight
        displayName: 'Store'
        steps:
          - template: azure-pipelines-ios-testflight-template.yml
            parameters:
              fastlaneLane: 'store_testflight'
trigger:
  - master # or whatever your main branch is named

pool:
  vmImage: 'macos-13' # Don't use macos-latest because it's not the latest macos image in the pool. Change this to whatever the latest macos version is if there's a newer version available.

variables:
  - group: ios-build-secrets # Create this variable group in Azure DevOps to store sensitive information
  - name: DEVELOPER_DIR
    value: '/Applications/Xcode_15.2.app/Contents/Developer'

stages:
  - stage: testflight
    displayName: 'TestFlight Beta iOS'
    jobs:
      - job: BetaTestFlight
        displayName: 'Beta'
        steps:
          - template: azure-pipelines-ios-testflight-template.yml
            parameters:
              fastlaneLane: 'beta_testflight'
Some notes:
- You still need to create the variable group
ios-build-secretsin Azure DevOps. You can use the same variable names as in the previous article. - Creating a new pipeline in Azure DevOps is a bit tricky. As of this writing, unfortunately there's no way to simply create a pipeline and specify which YAML file to use. You have to first create a new pipeline in Azure DevOps, then go to the pipeline settings and specify the YAML file to use. It will be so much easier if you have admin rights.
Image

Using the two configuration files above, both apps will be automatically deployed to TestFlight from Azure DevOps pipeline simulatenously whenever there is a new commit to the master branch. In result, the testers can install the beta version of the app from TestFlight and the app store version from the App Store in the same iPhone. Once everything is working as expected, the owner or the admin of the app can submit the store version to the App Store.
Disclaimer
Setting up CI/CD for deploying apps from Azure DevOps to TestFlight is not a trivial task. I unfortunately didn't document every steps I took to set up the pipeline. So you should be able to figure out any problems you encounter on your own. But if you have any questions, feel free to ask me. I might be able to help you.
By the way, I'm making a book about Pull Requests Best Practices. Check it out!