- Published on
How to deploy React Native iOS app to TestFlight from Azure DevOps pipeline
This is just a guide for my future self to deploy quickly
- Authors
- Name
- Nico Prananta
- Follow me on Bluesky
When you develop an iOS app, Android app, or a cross-platform app using React Native in a company, there is one thing you need to implement as soon as possible to save you tons of troubles in the future: the CI/CD (Continuous Integration/Continuous Deployment) pipeline to deploy or submit the app to App Store or Play Store. Because unlike deploying websites, deploying mobile apps has a lot of steps. The sooner you can automate the deployment process, the faster you can get the app out to users, and in return, you can get feedback faster too. Even if only to internal users.
Aside from being able to have a quick feedback loop, the main purpose of the CI/CD pipeline to deploy or submit the app to App Store or Play Store is to prevent only a single person from being able to deploy the app. We don't want to be unable to deploy the app if the person is not available or having problems with their computer.
In the Apple ecosystem, we can deploy beta versions of our apps to TestFlight. In this guide, I'll show you how to deploy a React Native app to TestFlight from an Azure DevOps pipeline because that's what the company I work for uses.
The tools
To accomplish this, we'll use the following tools:
- Xcode: The official Apple developer tool to build and debug iOS apps.
- Fastlane: A tool to automate the deployment process.
- Azure DevOps: A cloud-based DevOps platform.
- CocoaPods: A dependency manager for Swift and Objective-C projects.
- Ruby: A dynamic, open source programming language with a focus on simplicity and productivity.
- Bundler: A tool for managing dependencies in a Ruby project.
Aside from the repository where the app is stored, we also need another repository to store the encrypted certificates and provisioning profiles. You need access to both repositories to be able to deploy the app to TestFlight.
The requirements
- An Apple account. Your account must be a member of the team that you want to deploy the app to in AppStore Connect. You need to have Admin rights in the team to be able to generate certificates, app identifiers, and provisioning profiles.
- Another Apple account if you want to use a different account to deploy the app to TestFlight from the Azure DevOps pipeline. Otherwise, you can use the same account as the one you use to deploy the app to AppStore Connect.
- Create an app-specific password for the Apple account that will be used in the pipeline.
- Create a Personal Access Token in Azure DevOps that will be used in the pipeline. Go to
https://dev.azure.com/<your_organization>/_usersSettings/tokensto create a new token.
Setup
Ruby and Bundler
Fastlane and CocoaPods require Ruby to be installed. I normally use rbenv to manage Ruby versions and to avoid using sudo to install gems. At the time of this writing, I use ruby 3.3.4.
Once ruby is installed, you can install bundler by running the following command: gem install bundler. I use bundler to manage the gems in my project.
Fastlane and CocoaPods
Once we have bundler installed, we can create a Gemfile in the root directory of the repository to list the gems we need. Here's the Gemfile:
source 'https://rubygems.org'

gem 'fastlane'
gem 'cocoapods'
Then run bundle install to install the gems. Once the gems are installed, you need to use bundle exec to run the commands of the gems. For example, to run any commands from fastlane, you need to run bundle exec fastlane. Or to install the pods, you need to run bundle exec pod install.
Match
To submit an iOS app, we need to archive the app and sign it with a valid certificate. It is a very complicated and tedious process. Fortunately, the community has already done a lot of work to make this process easier: Fastlane's match. Using match, the team and in this case the pipeline, can use the required certificates and provisioning profiles securely. You can read more about code signing and managing certificates in this guide from Fastlane. But the idea is to first generate the certificates and provisioning profiles, then store them securely in a Git repository. Then on a new computer, you can use match to install the certificates and provisioning profiles.
To get started, run bundle exec fastlane match init. Follow the instructions to generate the certificates and provisioning profiles, and to store them securely in a Git repository. This is why you need to have an Apple account with admin rights.
Secrets in Azure DevOps
The pipeline will need to perform tasks that require authentication like deploying the app to TestFlight. We can store these secret keys in Azure DevOps by creating a variable group. In your Azure DevOps project's sidebar, go to Pipelines > Library > Variable Groups. Click on + Variable Group and name it something, e.g., ios-build-secrets. Next, add these variables:
| Variable | Description | Note |
|---|---|---|
MATCH_PASSWORD | The password you set when you initialize the match command. | Make sure to keep it secret. |
FASTLANE_USER | The email address of the Apple account. | |
FASTLANE_PASSWORD | The password of the Apple account. | May not be needed anymore due to app-specific password usage. Make sure to keep it secret. |
FASTLANE_APPLE_APPLICATION_SPECIFIC_PASSWORD | The app-specific password. | Make sure to keep it secret. |
AZURE_PAT | The Azure DevOps personal access token. | Make sure to keep it secret. Note that Azure personal access token cannot be set to valid forever. If your pipeline fails because it cannot access the match repository, it's probably because the token has expired. |
There is another way to interact with the AppStore connect which uses the API key instead of the app-specific password. But at the time of implementing the pipeline, I didn't have the rights to create an API key. So I used the app-specific password instead.
The pipeline configuration
This is the pipeline configuration I use to deploy the app to TestFlight:
trigger:
  - main # or whatever your main branch is named

pool:
  vmImage: 'macos-13'

variables:
  - group: ios-build-secrets # Create this variable group in Azure DevOps to store sensitive information
  - name: DEVELOPER_DIR
    value: '/Applications/Xcode_15.2.app/Contents/Developer'

stages:
  - stage: testflight
    displayName: 'TestFlight iOS'
    jobs:
      - job: BuildAndUpload
        displayName: 'Build and Upload'
        steps:
          - task: NodeTool@0
            inputs:
              versionSpec: '20.x' # or whichever version you're using
            displayName: 'Install Node.js'

          - script: |
              echo Installed Xcode versions:
              ls /Applications | grep 'Xcode'
              echo currently selected xcode:
              xcrun xcode-select --print-path
              echo selecting latest xcode...
              sudo xcode-select -s /Applications/Xcode_15.2.app
              xcrun xcode-select --print-path
              xcodebuild -version
            displayName: 'Select Xcode version'

          - script: |
              echo "SOME_ENV_FOR_REACT_NATIVE_APP=$(SOME_ENV_FOR_REACT_NATIVE_APP)" > .env
              echo "SOME_ENV_FOR_REACT_NATIVE_APP_2=$(SOME_ENV_FOR_REACT_NATIVE_APP_2)" >> .env
            displayName: 'Create .env file'
            env:
              SOME_ENV_FOR_REACT_NATIVE_APP: $(SOME_ENV_FOR_REACT_NATIVE_APP)
              SOME_ENV_FOR_REACT_NATIVE_APP_2: $(SOME_ENV_FOR_REACT_NATIVE_APP_2)

          - task: Cache@2
            inputs:
              key: 'npm | "$(Agent.OS)" | package-lock.json'
              restoreKeys: |
                npm | "$(Agent.OS)"
              path: $(System.DefaultWorkingDirectory)/node_modules
              cacheHitVar: NPM_CACHE_RESTORED
            displayName: Cache node_modules

          - script: |
              npm ci
            displayName: 'Install dependencies'
            condition: ne(variables.NPM_CACHE_RESTORED, 'true')

          - task: Cache@2
            inputs:
              key: 'bundle | "$(Agent.OS)" | Gemfile.lock'
              restoreKeys: |
                bundle | "$(Agent.OS)"
              path: $(System.DefaultWorkingDirectory)/.bundle
              cacheHitVar: BUNDLER_CACHE_RESTORED
            displayName: 'Cache bundle dependencies'

          - script: |
              gem install bundler
              bundle config path $(System.DefaultWorkingDirectory)/.bundle
              bundle install
              bundle update
            displayName: 'Install and update bundle'
            condition: ne(variables.BUNDLER_CACHE_RESTORED, 'true')

          - task: Cache@2
            inputs:
              key: 'pods | "$(Agent.OS)" | ios/Podfile.lock'
              restoreKeys: |
                pods | "$(Agent.OS)"
              path: $(System.DefaultWorkingDirectory)/ios/Pods
            displayName: Cache CocoaPods

          - script: |
              cd ios
              bundle exec pod install
            displayName: 'Install CocoaPods dependencies'

          - script: |
              cd ios
              export MATCH_GIT_BASIC_AUTHORIZATION=$(printf ":$AZURE_PERSONAL_ACCESS_TOKEN" | base64)
              bundle exec fastlane beta
            env:
              MATCH_PASSWORD: $(MATCH_PASSWORD)
              FASTLANE_USER: $(FASTLANE_USER)
              FASTLANE_PASSWORD: $(FASTLANE_PASSWORD)
              FASTLANE_APPLE_APPLICATION_SPECIFIC_PASSWORD: $(FASTLANE_APPLE_APPLICATION_SPECIFIC_PASSWORD)
              AZURE_PERSONAL_ACCESS_TOKEN: $(AZURE_PAT)
            displayName: 'Build and Upload to TestFlight'
Few notes about this configuration:
- At the time of this writing, you should not use
macos-latestfor the vmImage because for some reason it's not the latest, that's why I'm usingmacos-13instead. - You have to find out which version of the latest Xcode is available. In this pipeline, I'm using
15.2because that's the latest version of Xcode available in the vmImage at the time of this writing. Then you have to make sure your pipeline is using the latest Xcode as shown above by runningsudo xcode-select -s /Applications/Xcode_15.2.app. - For some reason, just by exposing the environment variables in the step doesn't work. My React Native app doesn't use the environment variables I expose in the step. So that's why I added the step to create the
.envfile. - The app is built and uploaded to TestFlight using Fastlane as shown in the command
bundle exec fastlane beta.
The Fastfile I use to build and upload the app to TestFlight:
default_platform(:ios)

platform :ios do
  desc "Push a new beta build to TestFlight"
  lane :beta do
    setup_ci

    match(
      type: "appstore",
      readonly: is_ci,
      git_basic_authorization: ENV['MATCH_GIT_BASIC_AUTHORIZATION']) # This automatically creates or downloads certificates, provisioning profiles, and more

    update_project_team( # Set the right team on your project
      teamid: CredentialsManager::AppfileConfig.try_fetch_value(:team_id)
    )

    build_id = ENV['BUILD_BUILDID'] # use azure devops build id. tried latest_build_number action but it needs the App Store Connect API key.

    increment_build_number(
      xcodeproj: "your_project_name.xcodeproj",
      build_number: build_id)

    build_app(
      workspace: "your_project_name.xcworkspace",
      scheme: "your_project_name",
      clean: true,
      verbose: true,
      export_method: "app-store",
      build_path: "./builds",
      output_directory: "./builds")

    upload_to_testflight(
      skip_waiting_for_build_processing: true,
      apple_id: CredentialsManager::AppfileConfig.try_fetch_value(:apple_id),
      username: ENV['FASTLANE_USER'],
    )
  end
end
and the Appfile:
app_identifier("com.your.app") # The bundle identifier of your app
itc_team_id("xxxxxx") # App Store Connect Team ID
apple_id("xxxxxx") # Apple ID
Few notes about the Fastfile and Appfile:
- I use the Azure DevOps build id to set the build number of the app because it's the easiest to have different build numbers every time. This way, I won't have to worry about App Store Connect complaining about duplicate build numbers.
- The
skip_waiting_for_build_processing,apple_id, andusernameare required to upload the app to TestFlight using the app-specific password. Otherwise, it will use the normal login and it will ask for the 2FA code which we cannot enter since it's running in a non-interactive pipeline. - The
apple_idvalue is NOT the email address of the Apple account. It is actually the generated ID assigned to your app. You can find it by going to the "App Information" page in App Store Connect which is under the "General" section. Or, you can find it in the URL when you go to the app's page in App Store Connect. For example, if the app's page URL ishttps://appstoreconnect.apple.com/apps/xxxxxx/distribution/ios/version/inflight, then theapple_idisxxxxxx.
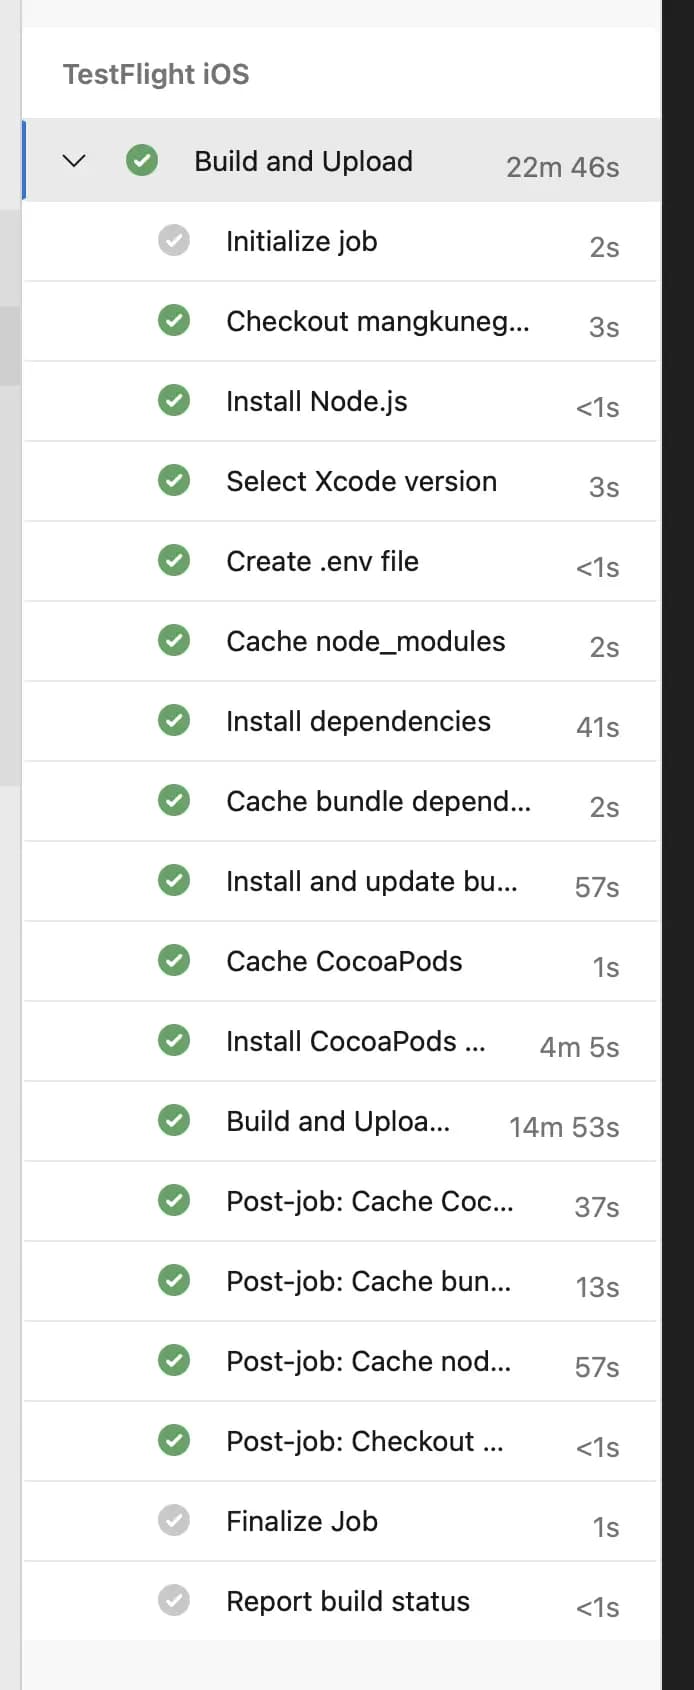
That's it! Now you can run the pipeline and it will build and upload the app to TestFlight. But a few warnings:
- Building and uploading the app to TestFlight from a computer that you don't own is very fragile. Just a small difference between the computer you own and the computer you use to run the pipeline can cause the pipeline to fail.
- The mac computer that is used in the pipeline is not as powerful as the mac computer you own. Running the pipeline above takes around 20 minutes!
Image
Update
I have a new article to deploy two versions of the app to TestFlight from Azure DevOps pipeline. Check it out here.
By the way, I'm making a book about Pull Requests Best Practices. Check it out!