- Published on
How to install and run pg-boss via Coolify
Background jobs with Postgres?!
- Authors
- Name
- Nico Prananta
- Follow me on Bluesky
In real world applications, having a way to run tasks, operations, or jobs in the background is inevitable. Even in a common and seemingly simple feature like registration, there are many scenarios where you need to run a task in the background. For example, you might need to send an email to a user after they register. Or you might need to update a user's profile after they register. Or you might need to send a notification to a user after they upload a file. In these cases, you need to have a way to run these tasks in the background because they might take a long time to complete.
In Hyperjump's flagship app, Neo Sense, we use Bull to run background tasks which uses Redis under the hood. Bull provides an API that takes care of all the low-level details and enriches Redis basic functionality so that more complex use-cases can be handled easily. Bull uses Redis because it is great for queue system.
While Bull is great, but using Redis means you have one more tool to maintain and monitor. If you've been using Postgres in your project, you might want to consider using pg-boss instead.
Installing pg-boss
To be able to use pg-boss, your Postgres database must have pgcrypto extension installed. You can install it by running the following query in your database:
CREATE EXTENSION pgcrypto;
And that's it! Next you just need to install pg-boss in your project via npm:
npm install pg-boss
For example, you may want to do background tasks in your Next.js Route handler:
import { prismaClient } from "@/prisma/prisma-client";
import PgBoss from "pg-boss";

export const POST = async (req: Request) => {
  // get the task from the request body
  const { task } = await req.json();
  // create pg-boss instance
  const pgboss = new PgBoss(process.env.PGBOSS_URL!)
  // log errors
  pgboss.on("error", (error) => console.error(error));
  // start the instance
  await pgboss.start();
  // set the name of the queue
  const queue = "job-1";
  // send the job to the queue
  const jobId = await pgboss.send(queue, { task });
  // start the work
  await pgboss.work(queue, someAsyncJobHandler);

  return Response.json({ jobId });
};

// the function that will be executed in the background
async function someAsyncJobHandler(job: PgBoss.Job<{ task: string }>) {
  console.log(`staring job ${job.id}`);
  // do some long running task
  await prismaClient.log.create({
    data: {
      data: job.data,
    },
  });
}
One thing to note is that like when using Bull, you cannot use pg-boss in a serverless environment like Vercel. You need to use a long running server to run the background jobs. For the example above, you can either run the Next.js app in your own server or use a separate long running server that will run the background jobs. But if you deploy your application to Vercel or other serverless platforms, you might want to look into Inngest or Trigger.dev.
Installing pg-boss with PgBouncer via Coolify
When I played around with pg-boss, I quickly got hit by the usual Postgres' connection limit problem. And as usual, the solution is to use PgBouncer. You can check my previous post on how to install PgBouncer via Coolify here.
Since pg-boss requires Postgres and Postgres requires PgBouncer to work properly, I created a docker compose file that will install both of them and immediately install the pgcrypto extension in the database. Here's the docker compose file:
services:
  db:
    image: 'postgres:16-alpine'
    volumes:
      - 'pg_boss_data:/var/lib/postgresql/data'
      - './init-scripts:/docker-entrypoint-initdb.d'
      - './init-scripts/enable-pgcrypto.sql:/docker-entrypoint-initdb.d/enable-pgcrypto.sql'
    environment:
      - 'POSTGRES_USER=${DB_USER:-postgres}'
      - 'POSTGRES_PASSWORD=${DB_PASSWORD:-postgres}'
      - 'POSTGRES_DB=${DB_NAME:-pgboss}'
    healthcheck:
      test:
        - CMD-SHELL
        - 'pg_isready -h 127.0.0.1 -p 5432 -U $$POSTGRES_USER'
      interval: 10s
      timeout: 5s
      retries: 5
      start_period: 10s
  pgbouncer:
    image: edoburu/pgbouncer
    environment:
      - 'DB_USER=${DB_USER:-postgres}'
      - 'DB_PASSWORD=${DB_PASSWORD:-postgres}'
      - DB_HOST=db
      - 'DB_NAME=${DB_NAME:-pgboss}'
      - AUTH_TYPE=scram-sha-256
      - POOL_MODE=transaction
      - 'ADMIN_USERS=postgres,dbuser'
    depends_on:
      - db
    healthcheck:
      test:
        - CMD-SHELL
        - 'pg_isready -h 127.0.0.1 -p 5432 -U $$DB_USER'
      interval: 10s
      timeout: 5s
      retries: 5
      start_period: 10s
volumes:
  pg_data: null
You can then use that docker compose file in Coolify. But before deploying the services, you need to do the following first:
- Set the
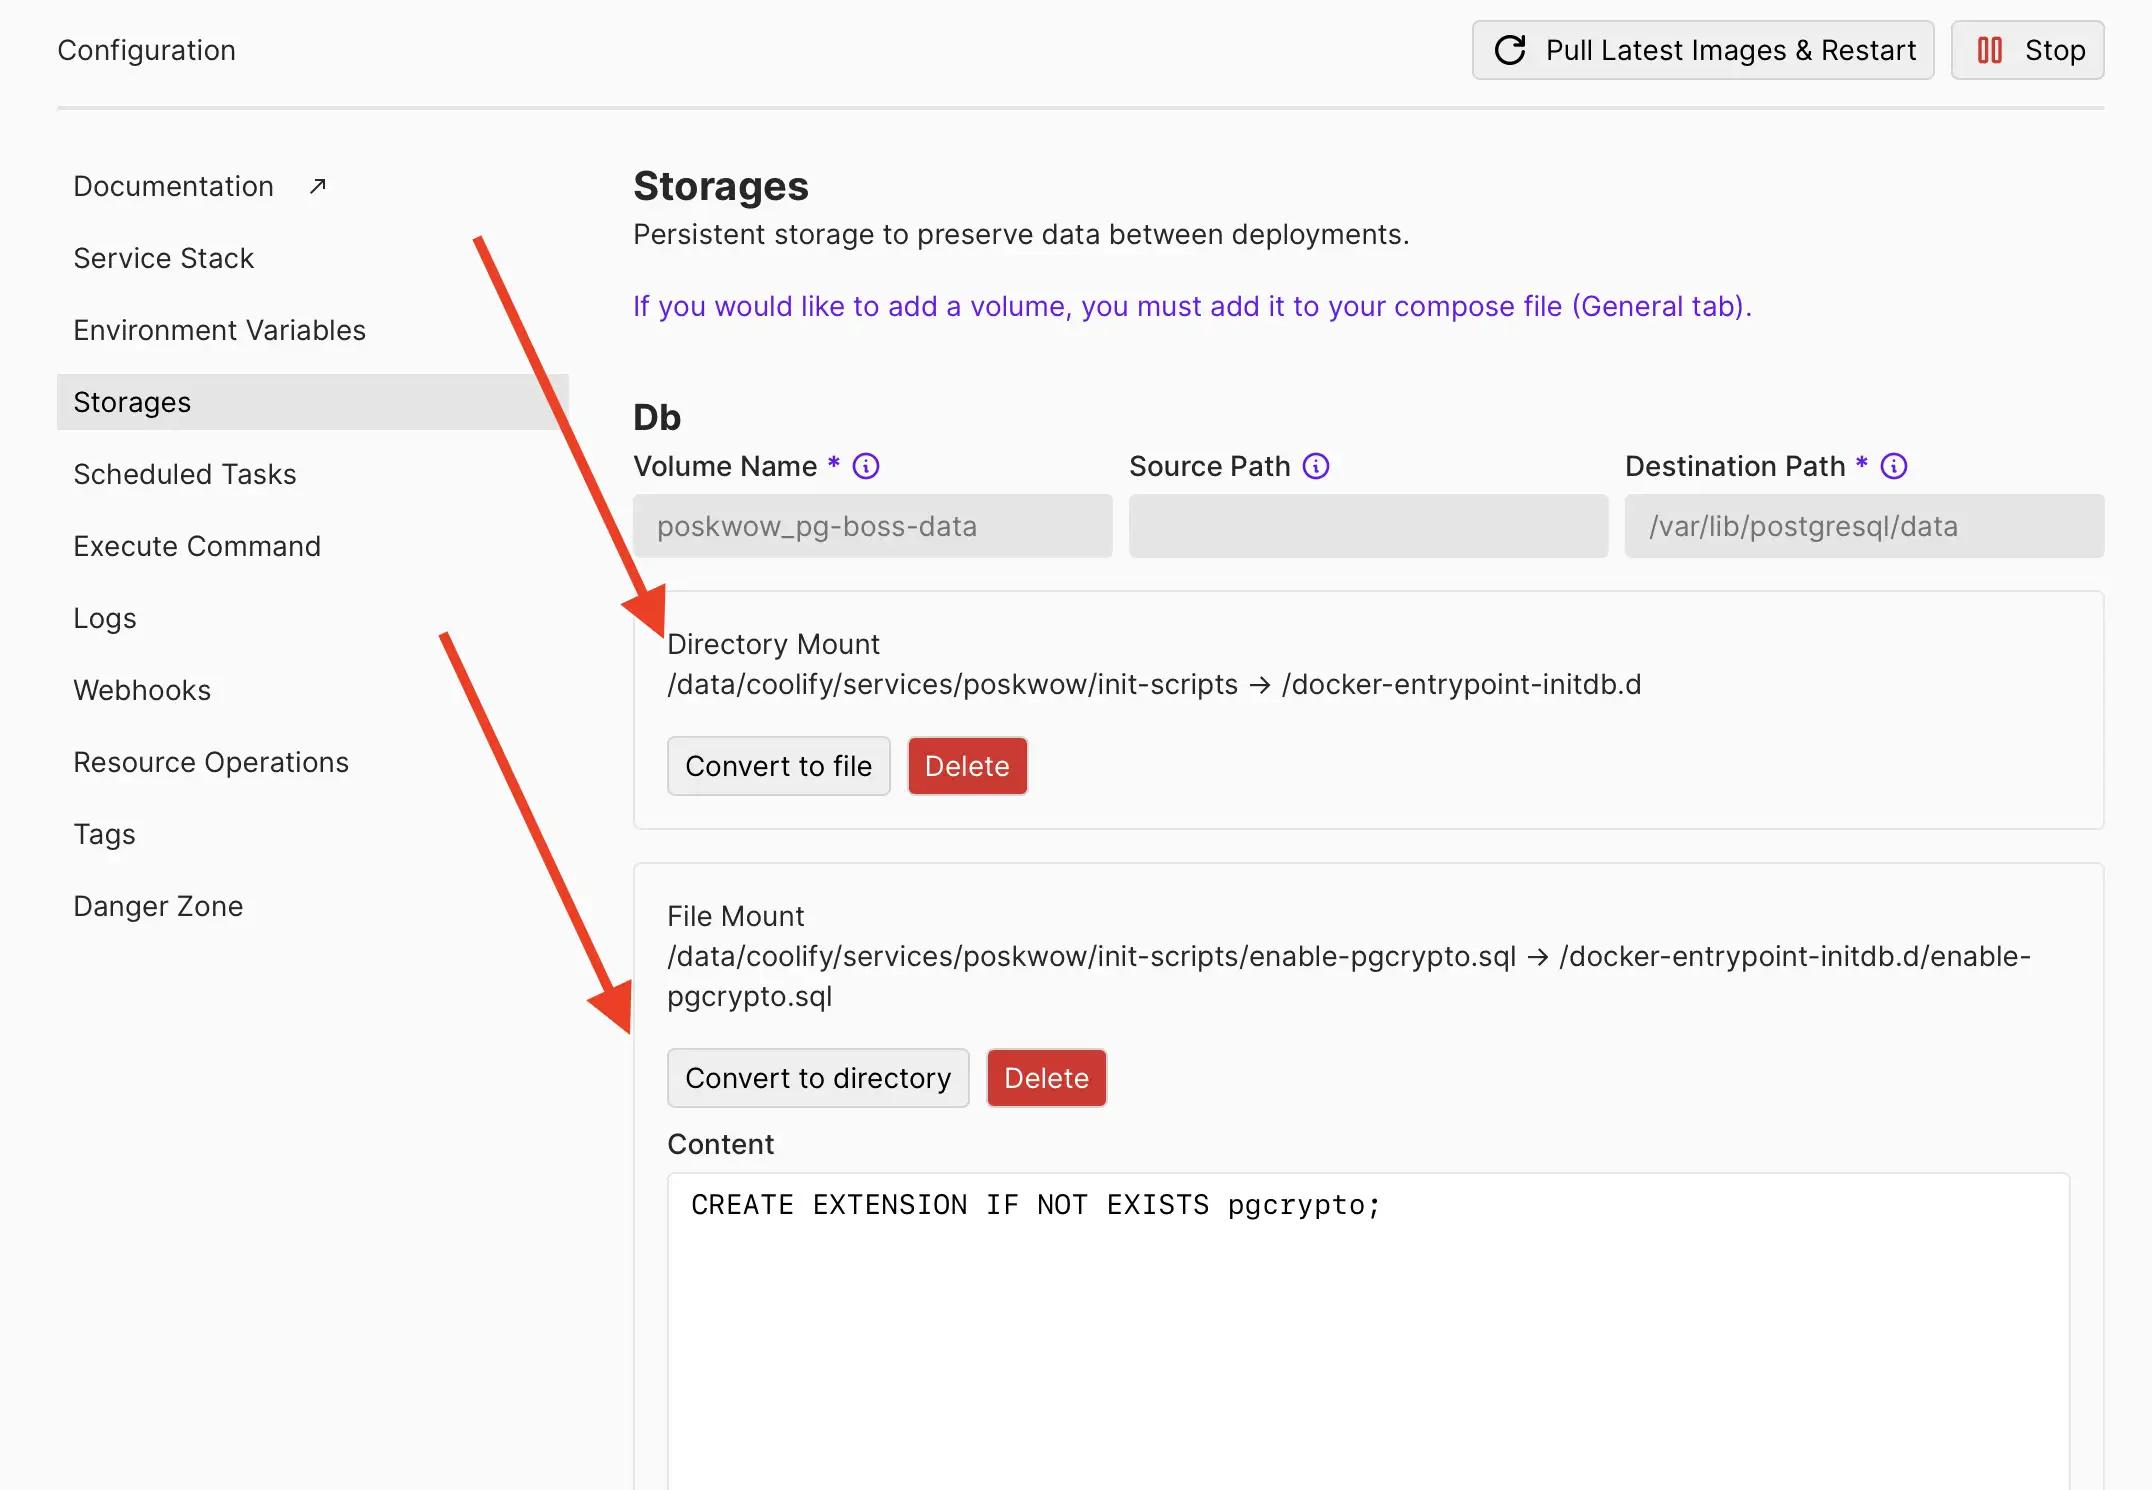
DB_USER,DB_PASSWORD, andDB_NAMEenvironment variables in the application's "Environment Variables" page in Coolify. - Then go to "Storages" page. You should have two mounts:
/data/coolify/services/<someuuid>/init-scriptsand/data/coolify/services/<someuuid>/init-scripts/enable-pgcrypto.sql. You need to convert/data/coolify/services/<someuuid>/init-scriptsto directory. Then in/data/coolify/services/<someuuid>/init-scripts/enable-pgcrypto.sql, you need to add the following content:
CREATE EXTENSION IF NOT EXISTS pgcrypto;
Image
That's it! Now you can deploy both services (PgBouncer and Postgres) and use pg-boss in your web application by setting the value of the PGBOSS_URL environment variable to the address of the PgBouncer service:
PGBOSS_URL=postgresql://DB_USER:DB_PASSWORD@pgbouncer-<service_uuid>:5432/DB_NAME
Few notes:
- Replace
<service_uuid>with the UUID of the pgbouncer service as seen in the URL in Coolify dashboard.pgbouncer-<service_uuid>is essentially the container name of the PgBouncer service assigned by Coolify. You can find the full container name by clicking the "Edit Compose File" in the PgBouncer+Postgres application page in your Coolify dashboard, then click "Show Deployable Compose". You will see the name of the container incontainer_nameorCOOLIFY_CONTAINER_NAMEvalues. - Replace
DB_USER,DB_PASSWORD, andDB_NAMEwith the values of theDB_USER,DB_PASSWORD, andDB_NAMEenvironment variables you set in the application's "Environment Variables" page in Coolify. - If your web application is not deployed via Coolify, you need to expose the port on which PgBouncer is listening. Then use the real IP address of the server instead of the
pgbouncer-<service_uuid>value.
By using this docker compose file, you can quickly use pg-boss in your application. Furthermore, your main database and the pg-boss database will be isolated from each other. So if you are adding tons of jobs to the queue, you won't have to worry about the main database being overloaded.
Are you working in a team environment and your pull request process slows your team down? Then you have to grab a copy of my book, Pull Request Best Practices.
Image